JANOME DC5100 Libretto delle Istruzioni
Navigare online o scaricare Libretto delle Istruzioni per Macchine da cucire JANOME DC5100. JANOME DC5100 Instruction Booklet Manuale Utente
- Pagina / 60
- Indice
- RISOLUZIONE PROBLEMI
- SEGNALIBRI
- Instruction book 1
- IMPORTANT SAFETY INSTRUCTIONS 3
- SAVE THESE INSTRUCTIONS 3
- TABLE OF CONTENTS 4
- SECTION I. NAME OF PARTS 6
- Standard accessories 7
- For your safety 8
- Controlling sewing speed 8
- Operating instrucitons: 8
- Cursor keys 10
- Mode key 10
- Stitch width selection key 10
- Stitch length selection key 10
- Memory key 11
- Clear key 11
- Function touchpad 11
- Number key selection 12
- Language selection 13
- Presser foot lifter 14
- Thread cutter 14
- Extension table 14
- Changing needle 15
- Changing presser foot 15
- Bobbin winding 17
- Threading the machine 20
- SECTION III. BASIC SEWING 23
- Turn a square corner 24
- Quilting 24
- Manual stitch length 25
- Sewing on heavy fabrics 25
- Variable needle position 25
- To drop or raise the feed dog 26
- Quilting with walking foot 27
- Automatic reverse stitch 28
- Triple stretch stitch 28
- Straight stretch 28
- Auto-lock stitch 29
- Saddle stitch 29
- Zigzag stitch 29
- Overcasting 30
- Tricot stitch 30
- Knit stitch 30
- Overedge stitch 31
- Double overedge stitch 31
- Button sewing 32
- Automatic buttonhole 33
- Round end buttonhole 35
- Keyhole buttonhole 35
- Knit buttonhole 36
- Stretch buttonhole 36
- Corded buttonhole 37
- Zipper sewing 39
- Zipper sewing (continued) 40
- Darning stitch 41
- Bartacking 42
- Pintucking 43
- Blind hem stitch 43
- Shell stitch 44
- Applique 44
- Smocking 45
- Fagoting 45
- Scallop stitch(B) 46
- Scallop stitch (A) 46
- Patchwork 47
- Satin stitch 47
- Decorative stitch 48
- Cross stitch 48
- Sand stitch 48
- Twin needle stitch 49
- Adjusting pattern balance 50
- Extender stitch combination 51
- Sewing letters 53
- Editing function 54
- Assemble the hook race 56
- Removing the light bulb 57
- Attaching the light bulb 57
- Troubleshooting 58
- 842-800-323 60
- Printed in Taiwan 60
Sommario
Instruction book
6tyuiWIDTHLENGTHMachine operating buttons (continued)t Cursor keysy Mode keyu Stitch width selection keyi Stitch length selection keyCursor keyst Curs
7o!0!1MEMCLRo!0!1Machine operating buttons (continued)o Memory key!0 Clear key!1 Function touchpadMemory keyo Memory keyThe memory key will memorize y
8Pattern selection and screen indicationYou can select these patterns directly by pressing thepattern keys. The following patterns can be selectedsimp
9MEMMEMzcxwqertLanguage selectionq Power switchw Memory keye Englishr Frencht Spanishz Tu r n on the power switch q while pressing the memorykey w.x
10qweqwwrqeePresser foot lifterq Presser foot lifterw Normal up positione Highest positionThe presser foot lifter q raises and lowers the presser foot
11Flat sideLado planoMéplat versNeedleAgujaAiguillezxcqwqwqeqweChanging needleq Needle clamp screww Needle clampz Tu rn off the power switch.Raise the
12Selecting Thread and NeedlesFor general sewing, use needle size 11/75 or 14/90. A finethread and needle should be used for sewing lightweightfabrics
13wqerBobbin winding• Removing the bobbinq Hook cover plate release buttonw Hook cover plateGently slide the hook cover plate release button q to ther
14xxzcv bnm•Winding the bobbinz Draw the thread from the spool.x Guide the thread around the thread guide.c Thread through the hole in the bobbin from
15zxcvqwerx Guide the thread into the first notch w on the front sideof the bobbin holder. Draw the thread to the left, sliding itbetween the tension
16qqweqzcvxbzxcvzxcvwThreading the machine• Threading the machineq Up/down needle position buttonw Spool* Raise the thread take-up lever to its highes
17zxcqqwerrqwtetAdjust the needle thread tension for a straightstitch•Correct tensionq Needle thread (Top thread)w Bobbin thread (Bottom thread)e To l
18rqwteqwqwqwAdjust the needle thread tension for a zigzagstitchFor an ideal zigzag stitch, the bobbin thread does not showon the right side (Top side
19• Changing sewing directionStop the machine and bring the needle down into thefabric by pressing the up/down needle positionl button.Raise the press
20Using the seam guides on the needle plateq Needle drop positionw Edge of fabrice Needle plate guide lineThe seam guides on the needle plate are engr
21Manual stitch lengthPress “–” or “+” to adjust the stitch length.To decrease length, press “–”.To increase length, press “+”.The pre-programmed stit
22Bastingq Stitch selector: 20w Needle thread tension: 1 to 3e Presser foot: Darning foot: Pr Feed dog: Dropped• Attaching the darning footq Foot hold
23Quilting with walking footThe walking foot is effective in preventing the fabric (lightmaterials, knits, real and imitation leather etc.) from slipp
24Automatic reverse stitchq Stitch pattern: 02w Needle thread tension: 2 to 6e Presser foot: Zigzag foot: Ar Presser foot: Straight stitch foot: Ht Re
25Auto-lock stitchq Stitch pattern: 10w Needle thread tension: 2 to 6e Presser foot: Zigzag foot: Ar Presser foot: Straight foot: HLower the needle cl
IIMPORTANT SAFETY INSTRUCTIONSThis appliance is not intended for use by persons (including children) with reduced physical, sensory ormental capabilit
26Overcastingq Stitch pattern: 04w Needle thread tension: 3 to 7e Presser foot: Overedge foot: CTricot stitchq Stitch pattern: 05w Needle thread tensi
27qweOveredge stitchq Stitch pattern: 06w Thread tension dial: 3 to 7e Presser foot: Overedge foot: CThis stitch pattern combines the straight and the
28z Match the buttonholes to the horizontal slot on thepresser foot.x Lower the foot to hold the button in place.c Tu rn the handwheel by hand until t
29qwe• Preparation for sewingq Groovew PinAttach the automatic buttonhole foot R. Make sure thegroove on the foot holder catches the pin on the foot w
30•Starting to sewAfter sewing the buttonhole stitch, the machine stopsautomatically.z The machine will auitomatically sew first the frontbartack and
31Adjusting the stitch width and density inbuttonholes•To change the stitch widthThe stitch width key controls the stitch width.The pre-set buttonhole
32Knit buttonholeq Stitch pattern: 16w Thread tension dial: 1 to 5e Presser foot: Automatic buttonhole foot: R* Sewing procedure is the same as autom
33Rz Use the same procedure as the automatic buttonholeprocedure.* Set the stitch width to match the thickness of the cordused.With the buttonhole foo
34Eyeletq Stitch pattern: 17w Needle thread tension: 1 to 4e Presser foot: Satin stitch foot: FThe eyelet is used for belt holes etc.qwe•To sewAttach
35• Attaching the zipper footq Groovew Pine To sew left sider To sew right sideFit the pin on the zipper foot into the groove on the footholder.•To s
IISECTION I. NAME OF PARTSNames of parts... 2Standard accessories ...
36Zipper sewing (continued)x Attach the foot with the pin on the right. Sewthrough all the layers from the end of the zipperopening, guiding the zippe
37•To sewz Pull the button holder to the rear.x Place the garment under the foot. Press the up/downneedle position button twice. Move the fabric to th
38Bartackingq Stitch pattern: 19w Thread tension dial: 3 to 6e Presser foot: Satin stitch foot: F• Memorizing bartackingTo sew another tack in the sam
39•To sewt When the needle comes to the lefty When the needle comes to the rightu Guidei Folded edgeThere is a sliding guide screw on the blind hem fo
40q Applique fabricw Slite EdgeApplique, a technique for stitching fabric shapes ontoanother fabric, opens limitless design possibilities.Dimension an
41qweqw•To sewq Wrong side (Bottom side) of fabricw Knotted edgee GathersSmocking is a delicate decorative treatment used onchildren’s clothes or wome
42•To sewz Fold the fabric with right sides together. Sew scallops3/8˝ (1 cm) from folded edge.x Tr im close to stitching leaving 1/8˝ (0.3 cm) seamal
43q werqwewqwwPatchworkq Stitch pattern: 43w Thread tension dial: 1 to 4e Presser foot: Satin stitch foot: Fr Presser foot: 1/4˝ seam foot: O* Stitch
44You can make beautiful designs with this embroidery stitchpattern, in half the time it would take if embroidered byhand. You can also combine cross
45This machine is equipped with a twin needle that can beused to sew parallel rows straight on decorative stitchesadding an exquisite touch to table l
IIITABLE OF CONTENTSEyelet ... 34• To sew ...
46qweAdjusting pattern balanceIf the decorative stitch patterns, letters , numbers ormanual buttonhole stitches are uneven when you sew on aparticular
47The extender stitch is especially useful for providingstraight stitches between combinations of stitch pattern 22(Blind hem stitch).z Select the mod
48Programming decorative stitch patternsTo repeat or continue the same combination of stitches,just press the foot control.z Select the mode 2.x Selec
49Sewing letters(Example: Sun)z Select the mode 3.x Select stitch pattern 29.c Press memory key.v Select stitch pattern 57.b Press memory key.n Select
50Deleting a stitch pattern, letter or number byeditingz Press key.x Shift the cursor to letter “D” by pressing the key.c Press CLR key.zxzxcCLREd
51Adding a letter or space between lettersz Press key.x Press the key and slide the cursor past the lastletter where you would like to add a lette
52Press the up/down needle position button to raise theneedle, then unplug the sewing machine.Remove the cover plate by sliding the cover plate releas
53qRemoving the light bulbMake sure the power switch is turned off.To change the light bulb, wait until the light bulb has cooleddown.z Open face plat
541. The needle thread is not threaded properly.2. The needle thread tension is too tight.3. The needle is bent or blunt.4. The needle is incorrectly
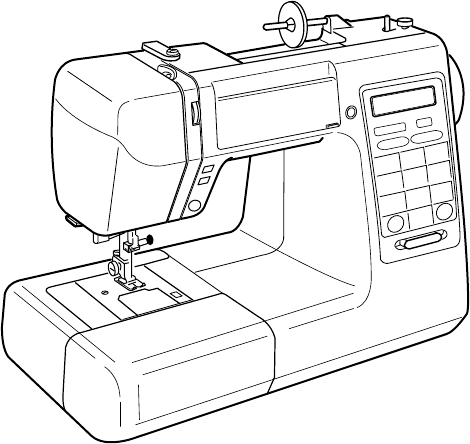
2!8@1#9 $0!9tyuio!0!1!2!3!4!5!6!7@0rewq@4@3@5@2@6@8@7#6#5#4#2#7#8@9#0#1$1#3SECTION I. NAME OF PARTSNames of partsq Extension table (Accessory box)w Ne
842-800-323Printed in Taiwan
3q Bobbinw Spool pin felte Assorted needle setr Additional spool pint Straight stitch footy Zigzag foot (set on the machine)u Satin stitch footi Zippe
4qwertyFor your safety* While in operation, always keep your eyes on the sewingarea. Do not touch any moving parts such as the threadtake-up lever, ha
5qwerqwerMachine operating buttonsq Up/down needle position buttonw Auto-lock buttone Reverse stitch buttonr Screen sharpness adjusting dialUp/down ne
Prodotti e manuali riguardandi Macchine da cucire JANOME DC5100
 (28 pagine)
 (75 pagine)
 (64 pagine)

 (111 pagine)
© 2020, manymanuals.it. Tutti i diritti riservati | 4.540 s |
 Manymanuals.com
 Manymanuals.de
 Manymanuals.fr
 Manymanuals.it
 Manymanuals.pl
 Manymanuals.cz
 Manymanuals.es
 Manymanuals-pt.com
Commenti su questo manuale